Share Components across Front Ends frameworks using Nx and Web Components - Part 2

This is the second of three Part Guides:
- Part 1 - Project Setup and Introduction to Web Component
- Part 2 - Add Custom Style and Property Binding
- Part 3 - Output Event and Allow Retrocompatibility.
Part 2 - Add Custom Style and Property Binding
In part one, we introduced Web Components, what they are and how to use them. We also created and set up an Nx workspace with an Angular and React project alongside a shared Web Components library. We created a custom element that "listens" to the attribute title and changed the DOM content accordingly. In this second part, we are going further by styling and assigning properties to our Web Components.
1. Style our Web Component
Our Web Component works, but they are very flat at the moment. It would be great to add some CSS to it. You may want to add a CSS class to our title and create a global stylesheet with some rules, and it would work. But the idea behind Web Components is creating fully independent elements that are auto-sufficient and do not require anything from the "outside". Adding a global CSS class would affect every element on our page and quickly turn into a gigantic file full of rules.
Hopefully, Web Components allow us to use Shadow DOM, which makes us able to keep the markup structure, style, and behavior hidden and separate from other code on the page. Thanks to it, elements will not clash, and the code will be kept simple and clean.
Let's head back to our library (set up in part one) and edit our title component (or create a new title element).
If you still have what we worked on, it should look like this (I removed the logs) :
export class DemoTitleElement extends HTMLElement {
    public static observedAttributes = ['title'];

    attributeChangedCallback(name: string, old: string, value: string) {
      this.innerHTML = `<h1>Welcome From ${this.title}!</h1>`;
    }
}

customElements.define('demo-title', DemoTitleElement);
In the above example, we just replaced the entire HTML inside our element for every update on our attribute title:
    attributeChangedCallback(name: string, old: string, value: string) {
      this.innerHTML = `<h1>Welcome From ${this.title}!</h1>`;
    }
As you may know, this method doesn't allow us to append some <style> tag. Therefore, we are unable to create new styles unless we manually write a class and add some global rules. Also, this approach is pretty poor in performance, as we recreate all the content for every change of our attribute. It would be great to have some kind of template...
Well, it turns out there is template) element that would suit our need! Templates are not rendered in the DOM, but can still be referenced via Javascript. We can then clone this template inside our Shadow DOM once and access it across our components.
Let's create one outside of our component class and assign the styles we like.
const template = document.createElement('template');
template.innerHTML = `<style>
    h1 {
      color: red;
    }
  </style>
  <h1>Welcome From <span id="title"></span>!</h1>`;
You will notice I added a span with an id where we would like to write the dynamic title. It will come in handy for updating our DOM without having to recreate the template entirely.
Now in our Component constructor, attach a Shadow DOM, and append our template to it.
export class DemoTitleColoredElement extends HTMLElement {
    public static observedAttributes = ['title'];

    constructor() {
      super();
      this.attachShadow({ mode: 'open' });
      this.shadowRoot.appendChild(template.content.cloneNode(true));
    }
}
Here is what we added
superwill call theconstructorofHTMLElementattachShadowattaches a shadow DOM tree to the specified element and returns a reference to its ShadowRoot. There can be two differentencapsulation modes.openmeans elements of the shadow root are accessible from JavaScript outside the root whileclosedDenies access to the node(s) of a closed shadow root from JavaScript outsidethis.shadowRoot.appendChildwe are adding our template to the shadow Root and usingtemplate.content.cloneNode(true)we are cloning all the DOM element we defined in the template.
Now, this is much better; our template is cloned once and will be available through shadowRoot inside the component.
When the attribute change, we can now update what interests us inside the template. As we only care about the title attribute, we can simply add the following.
    attributeChangedCallback() {
      this.shadowRoot.getElementById('title').innerHTML = this.title;
    }
We should end up with a component similar to this :
const template = document.createElement('template');
template.innerHTML = `<style>
    h1 {
      color: red;
    }
  </style>
  <h1>Welcome From <span id="title"></span>!</h1>`;

export class DemoTitleColoredElement extends HTMLElement {
    public static observedAttributes = ['title'];

    constructor() {
      super();
      this.attachShadow({ mode: 'open' });
      this.shadowRoot.appendChild(template.content.cloneNode(true));
    }

    attributeChangedCallback() {
      this.shadowRoot.getElementById('title').innerHTML = this.title;
    }
}

customElements.define('demo-title-colored', DemoTitleColoredElement);
Nice! Remember to add this new element to your library's export and try it on your Angular and/or React project. I added the old title we created previously and the new one on the bottom. What we expect to see is our old title to remain Black, while our new title should be Red (and do not affect h1 outside of it)
<demo-title [title]="'Angular'"></demo-title>
<demo-title-colored [title]="'Angular'"></demo-title-colored>
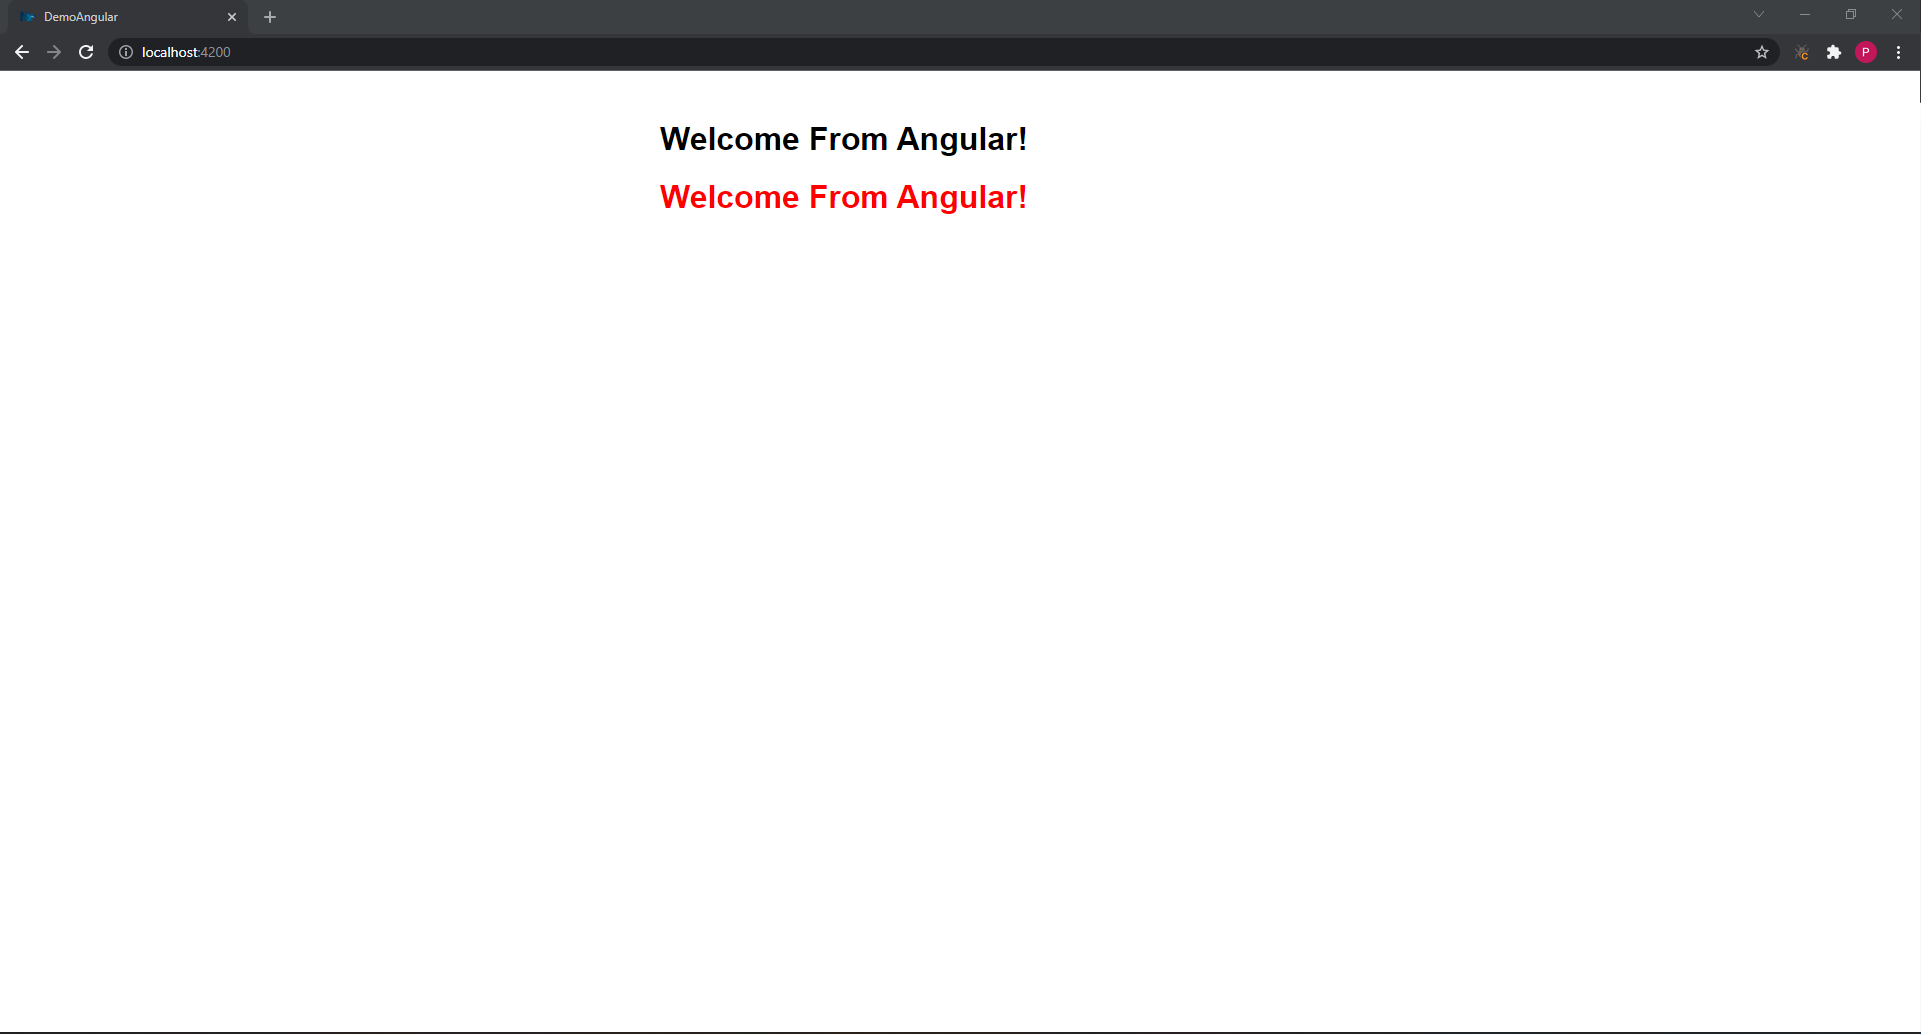
AWESOME! Our style is applied only to our Component!
2. Passing object to Web Components
One common thing we would like to do is pass objects to our Web Component, and not just simple strings.
Since Web Component attributeChangedCallback and observedAttributes works exclusively with attribute, a possible solution would be to stringify objects and pass them via the attribute data-* and our HTML would remain valid.
Let's try this first, we are going to pass a person object to our Web Component and simply display that person's name.
2.1 Passing objects via attributes
In our library, create a new element that will observe a custom attribute named data-person
export class DemoObjectElement extends HTMLElement {
    public static observedAttributes = ['data-person'];

    attributeChangedCallback(name: string, old: string, value: string) {
      console.log(`Attribute ${name} value:`, value);
    }
}

customElements.define('demo-object', DemoObjectElement);
Add this new element to your library's exports, and let's first use it in Angular.
Inside app.component.ts create this object :
  person = {
    firstName: 'Jack',
    lastName: 'Doe'
  }
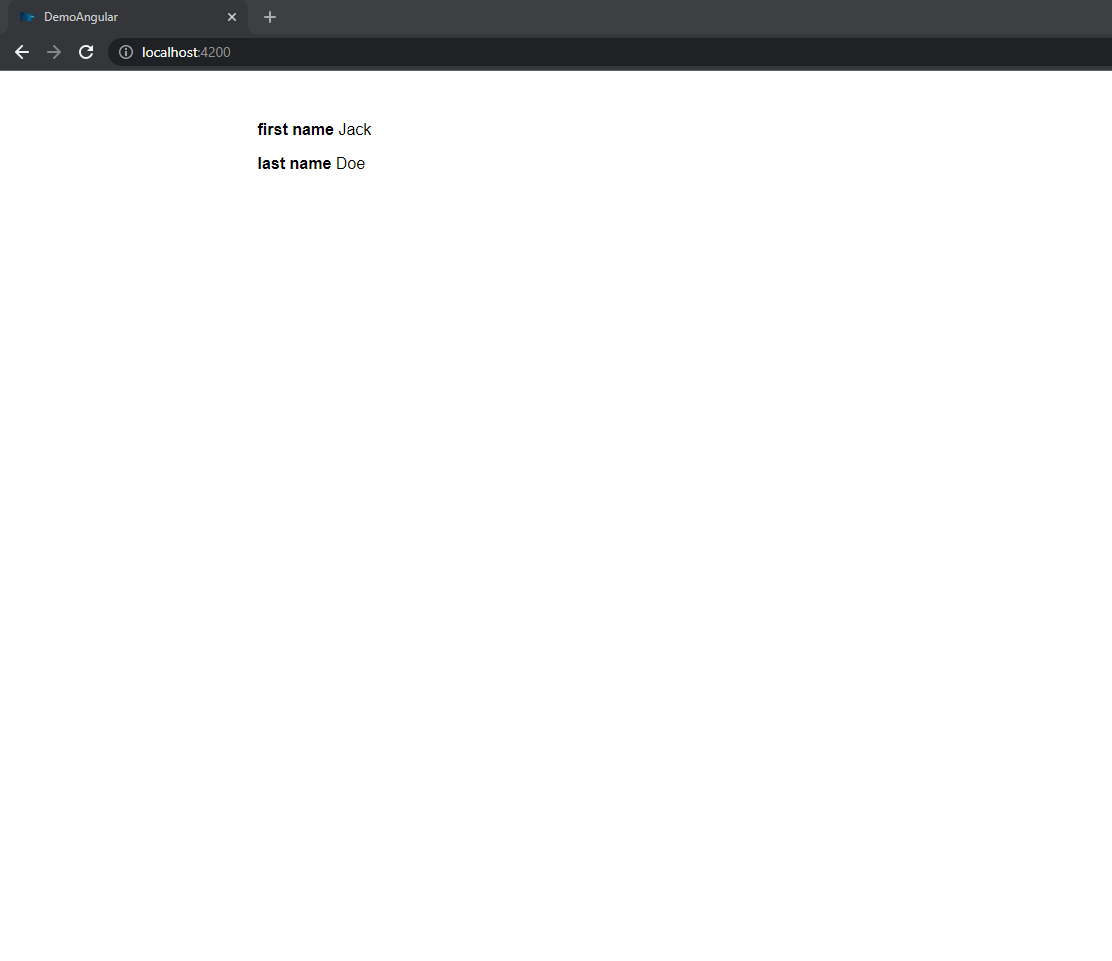
Move to the app.component.html add and assign our object to our web component. You have to specify Angular to use attribute by prefixing our binding with attr.person
<demo-object [attr.data-person]="person"></demo-object>
You will see that our Web Component log will look like this :
Attribute data-person value: [object Object]
Which is not what we want... To receive the entire object, we will need to use JSON.stringify first and then JSON.parse...
Update our Angular app.component.ts with the following line :
JSON = JSON;
and the template
<demo-object [data-person]="JSON.stringify(person)"></demo-object>
You can also update our Web Component log to display the value as an object
console.log(`Attribute ${name} value:`, JSON.parse(value));
It will now display our object as expected :
Attribute data-person value: {"firstName":"Jack","lastName":"Doe"}
For React, it is very similar. Open app.tsx and just add the following :
  return (
    <div className={styles.app}>
      <demo-object dataPerson={JSON.stringify(person)}/>/>
    </div>
  );
Since our Web Components are "natives" HTML elements, just assigning dataPerson will change the attribute data-person.
Passing objects as attributes is enough in some cases where we just want to assign small objects. But ideally, we do not wish to pollute attributes, and worst, assign objects that will need to be stringified and parsed at every change. What about passing things as properties instead? Well, we can, but it is a bit harder.
2.2 Passing Object via Properties
To allow our Web Component to receive properties, we first need to change a few things in the code. Web Components lifecycle works with attributes so we are required to manually detect property changes, and call our method ourselves. Additionally, as stated in the last part, Web Components are consumed like basic HTML, therefor passing property to HTML elements varies depending on the framework we use.
While we are at changes, let's also display the person's name and not just log it. Create a template in our component to do so.
const template = document.createElement('template');
template.innerHTML = `
<style>
    .name {
        font-weight: bold;
    }
</style>
<p>
    <span class="name">first name</span>
    <span id="firstName"></span>
</p>
<p>
    <span class="name">last name</span>
    <span id="lastName"></span>
</p>`;
Let's now change our component code. Assuming I would like to pass a property named person to my Web Component. If we do all like we are used to doing until now, we would be doing the following.
export class DemoProfileElement extends HTMLElement {
    public static observedAttributes = ['person'];

    constructor() {
      super();
      this.attachShadow({ mode: 'open' });
      this.shadowRoot.appendChild(template.content.cloneNode(true));
    }

    attributeChangedCallback() {
      this.update(this.person);
    }

    update(person: {firstName: string, lastName: string}) {
      this.shadowRoot.getElementById('firstName').innerHTML = person.firstName;
      this.shadowRoot.getElementById('lastName').innerHTML = person.lastName;
    }
  }

  customElements.define('demo-profile', DemoProfileElement);
But as your Typescript might tell, person is not an HTML attribute, so this.person is not defined. Additionally, the attributeChangedCallback will never be called since observedAttributes = ['person']; can't observe attributes that do not exist.
To fix this and make it work, we need to forget about what we did until now and implement our way to detect changes, like if we were coding a simple Typescript Class. You can try to fix it by yourself or just scroll for the solution.
We going to need a property in our class I chose _person, and a get/set that will assign to that property`
export class DemoProfileElement extends HTMLElement {
    _person = {
      firstName: '',
      lastName: '',
  };

  get person(){
    return this._person
  }
  set person(value: {firstName: string, lastName: string}){
    this._person = value;
    this.update(this._person);
  }

  constructor() {
    super();
    this.attachShadow({ mode: 'open' });
    this.shadowRoot.appendChild(template.content.cloneNode(true));
  }

  update(person: {firstName: string, lastName: string}) {
      this.shadowRoot.getElementById('firstName').innerHTML = person.firstName;
      this.shadowRoot.getElementById('lastName').innerHTML = person.lastName;
  }
}

customElements.define('demo-profile', DemoProfileElement);
Yes, we just use a get/set to check when the property is updated and update our DOM accordingly.
Let's try this in Angular, but before, don't forget to add this new element to your library's export!
When passing Input to a component, Angular will assign it as a property of that element. It makes things simple for us, as we do not need to change much.
In your Angular app, just add this line :
<demo-profile [person]="person"></demo-profile>
And that's it!
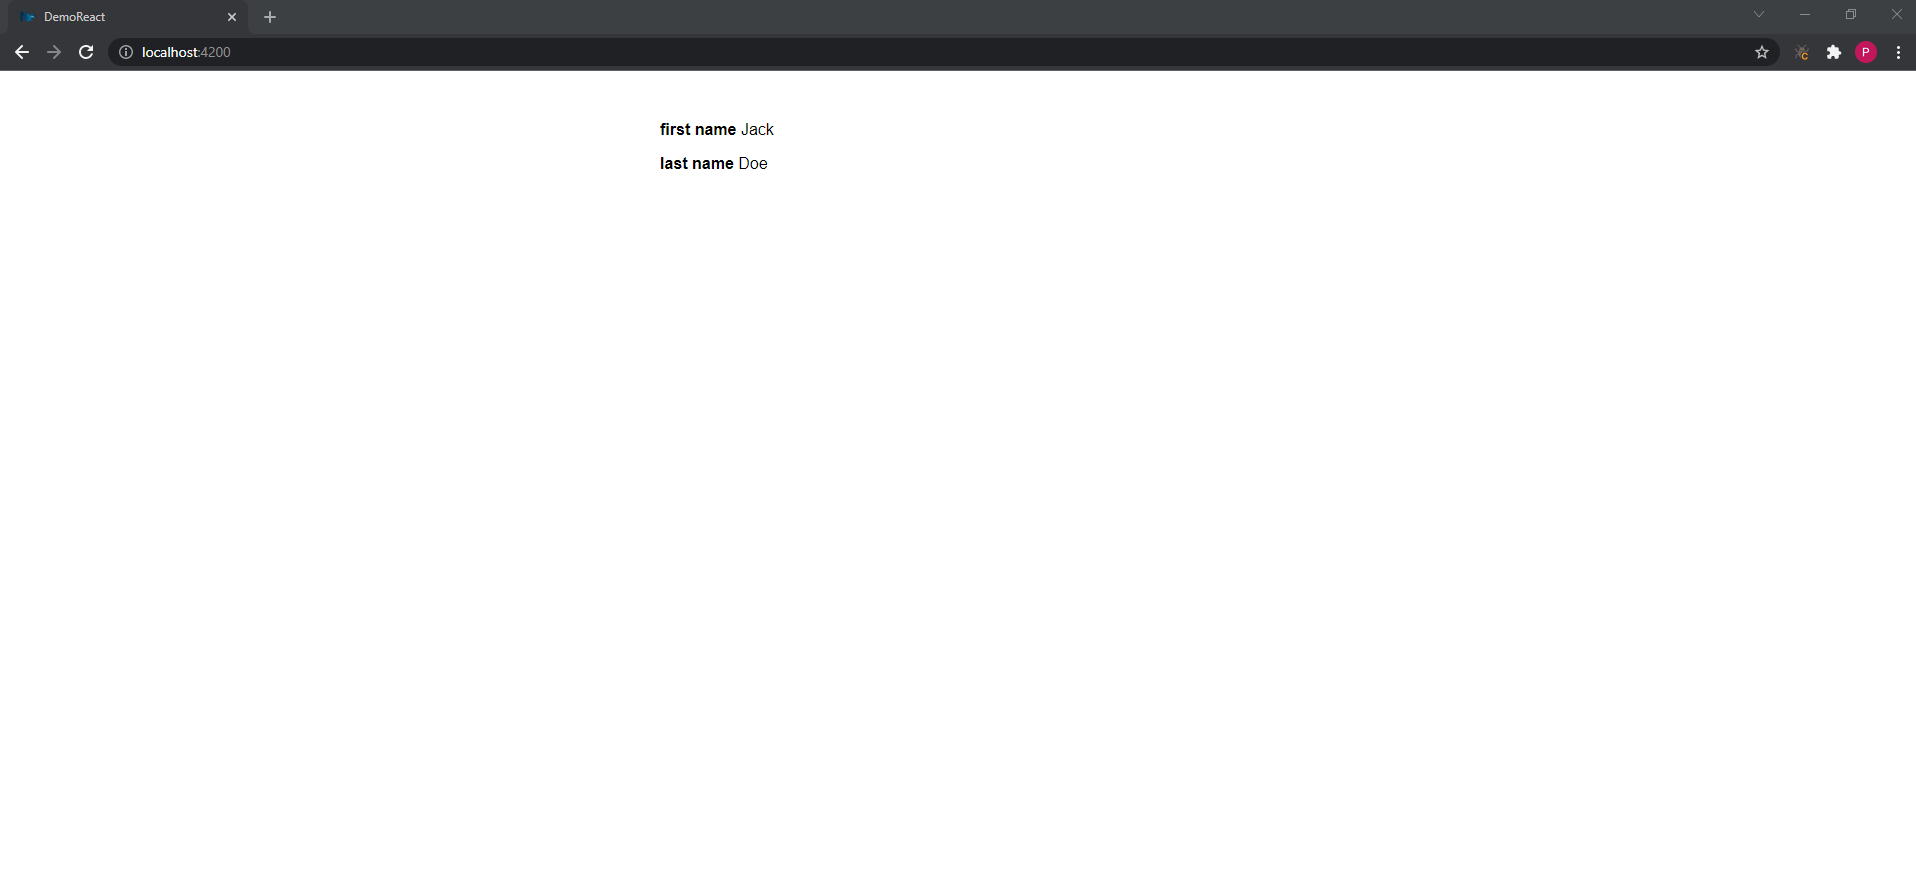
Let's head to React, where things are a bit different. React pass props as JSX Attributes, and therefore, simply doing <demo-profile person={person} /> will not work. We need to treat our Web Component as what it is, an HTML Element. So, get the reference and assign to it the property.
In your React app, add a Reference to our component, and after initialization, assigns the person property to our Web Component :
  import { DemoCounterElement, DemoProfileElement } from '@demo-shared/demo-library';

export function App() {
  const person = {
    firstName: 'Jack',
    lastName: 'Doe'
  }
  const profile = useRef<DemoProfileElement>(null);

  useEffect(function () {
    if(profile.current) {
      profile.current.person = person
    }
  }, []);

  return (
    <div className={styles.app}>
      <demo-profile ref={counter}/>
    </div>
  );
This is all also for React; start the project, and you will see the same result!
Great, we did almost all we would like to do, but there are still some things we might want to add. In the last part, we will add some custom events to be dispatched in our Web Component and add polyfill to use our component on old browsers.
You can find the entire repo here :
Found a Typo or some problem?
If you’ve found a typo, a sentence that could be improved, or anything else that should be updated on this blog post, you can access it through a git repository and make a pull request. Please go directly to https://github.com/Crocsx/dev.to and open a new pull request with your changes.


